Wall Hanging Pocket -2
You Must :
Bring one and or donate a box of" Zipper Gallen Storage Bag" by Next Art Class.


Slip in Clay: two jars per table


Tools on the demonstration table
Student's tools
Craft Sticks
Modeling Tools
Pin Tools
Carving tools

Teacher's tools and chair


Greenware 
How to design an useful wall hanging slab pocket ?
Rubric:
1. Determine the Functionality
Start by deciding what the wall pocket will be used for.
Key holder: A small pocket near the entrance for keys.
Mail or message holder: A larger pocket for mail, notes, or small notebooks
Planter: A pocket that holds small plants, such as succulents.
Utensil holder: A kitchen pocket for spatulas, whisks, or other small tools.
Key considerations for functionality:
- Depth and Hight of Pocket: (2 inches deep and 2.5 inches or more tall ). Make sure the pocket is deep enough to hold the intended items securely but not so tall and deep that it becomes difficult to remove objects.
- Ease of Access: Design the pocket holes ( one or tow hole) so that items can be easily placed and removed from the wall .
- Size of the Back Slab is 5x5 inches
2. Location of the Wall Pocket
- Entrance: A key holder might have a welcoming word carved into it, like “Home” or “Welcome.”
- Kitchen: If it’s a utensil or recipe holder, the pocket might have a more rustic or culinary theme.
- Office: A pocket for pens or notes could have a sleek, professional design, maybe with words like "Inspiration" or "Focus."
3. Shape and Design Style
- Geometric Shapes: Think cubes, cylinders, or rectangles. This gives the piece a modern, minimalist feel. Rectangular pockets:
- Organic Shapes: Consider forms inspired by nature, like leaves, animals, or abstract curves. These can make the pocket feel more artistic and unique.A leaf-shaped pocket
- Animal designs: Create a pocket in the shape of an animal, like a fish, bird, or turtle, where the body forms the pocket.
4. Techniques
A. Score and Slip Technique:
- Use this technique to securely join the pocket to the back slab. Scoring and slipping the attachment points ensures that the pocket won’t come loose once fired.
B. Additive Techniques:
- Add details to your design by attaching extra clay pieces, such as handles, decorative shapes (flowers, animals, etc.), or embellishments like small 3D shapes.
C. Subtractive Techniques:
- Carve or stamp textures into the clay for added visual interest. This could include:
- Carving patterns: Decorative lines or shapes that enhance the overall theme.
- Relief carving: Adding raised designs, like leaves or waves, for extra depth.
- Cut-out designs: Carve out sections to add artistic flair, such as holes or patterns.
D. Structure and Stability:
- Clay Thickness: Make sure the slab has an even thickness (around 1/4 inch /pencil width ) for structural integrity. Thicker walls might make the pocket too heavy, while thinner walls might be fragile.
5. Underglaze and Glaze Application:
- Underglaze: Apply three even coats of underglaze to add color and detail. This could highlight the carvings, textures, or other design elements.
- Clear Glaze: Finish with three coats of clear glaze to add shine and make the pocket waterproof and durable. Be sure to apply the glaze evenly to avoid uneven surfaces.
6. Craftsmanship:
- Smooth Edges: Make sure all edges are smooth to avoid sharp or jagged parts that could be dangerous or uncomfortable to touch.
- Refined Surfaces: Ensure that the form is carefully planned and executed. Avoid dents, bumps, or irregularities that might compromise the appearance or function.
- Even Thickness: Keep the slab and pocket walls consistent in thickness for a more polished look and better durability.
8. Sketch and Plan:
- Draw Multiple Views: Sketch your design from different angles (front, side, top) to plan the layout of the pocket, the hanging mechanism, and decorative elements.
- Add Notes: Make sure to add notes on dimensions, where the pocket will be located, and how it will function. This helps you visualize the final design.

Make a model out of paper. Create paper stencils . 

 Place guided strips on both sides of the clay to help you achieve an even thickness ofslab of 1/4 thickness.
Create paper stencils for the box's sides.
Trace/cut with a pin tool.

Remove the leftovers first.ach slabs


Score and slipUse a pin tool to score the edges of the slabs that are going to be joined. Apply slip to scored areas
Make sure you score and slip both joining surfaces. Carefully join the sides.

You will know you have a good bond when most of the slip has squeezed out and the pieces will not slide back and forth easily.
Wait another day to join the 4th piece. So the last slab is firm enough to be joined together.
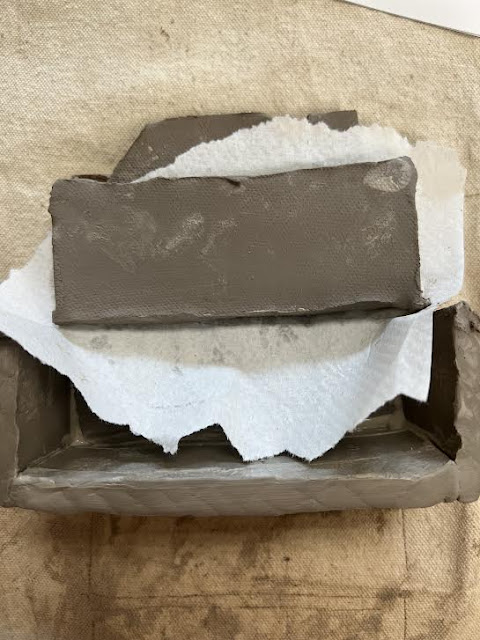
use folded paper towel and place in the pocket to add support to the 4th slab. 
Use a flat modeling tool to smooth the joined pieces.

Add a coil in the corners to make seams stronger. Gently press the coil into the corner.

Smooth the corners.


Make a model out of paper. Create paper stencils .

 |

Place guided strips on both sides of the clay to help you achieve an even thickness of
slab of 1/4 thickness.

Create paper stencils for the box's sides.

Remove the leftovers first.
ach slabs


Score and slip
Use a pin tool to score the edges of the slabs that are going to be joined.
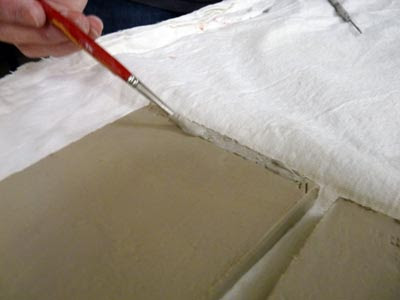
Make sure you score and slip both joining surfaces.


You will know you have a good bond when most of the slip has squeezed out and the pieces will not slide back and forth easily.

Wait another day to join the 4th piece. So the last slab is firm enough to be joined together.

use folded paper towel and place in the pocket to add support to the 4th slab.
 |
Use a flat modeling tool to smooth the joined pieces.

Add a coil in the corners to make seams stronger. Gently press the coil into the corner.

Smooth the corners.
