Observational Drawing
How to draw squashes and apples?
What are we going to learn from this lesson?
1. What is an observation drawing?
2. How to construct a shape?
3. How to use directional lines when drawing from observation?2. How to construct a shape?
4. How to use a pencil to check proportions?
5. How to apply shading to an object to form a 3-dimensional look.
Students learn to construct, shade and add colors and value to an object that they draw by observing.
Observational Drawing is when an artist observes something and responds to it with a visual representation


Squash and Apple

Answer the following Essential questions:
1. Why is drawing from direct observation so different than drawing from a photograph?
2. What is an image?
3. How can I improve my still-life drawing?
Still life with pencil
 Overlapping


Assignment 1 continues to build the slide.
Composition:
- Overlapping
- Crop out
- Off-center
- Rotation
1. One picture of Squash/ Apple in pencil drawing without adding shades.
- Overlapping
Not Overlaping


- Overlapping sketch


2. Crop the picture for an interesting composition
Crop Out
Art Tutor: Apply a grid to your photograph.


Acorn Squash sketch: Ellipses Top and Oval body

How to sketch an apple :
 |
Oil Pastel Practice

Apply Layers of Oil Pastel
1. Save white spots
2. Use Colors from light values to dark values
3. Keep adding layers to blend to colors
4. Add white/ light colors to create highlights
5. Add black/dark colors to create shadows
6. Save a tinny white line oo black line when marge overlapping space / background


Leave a skinny black or white line when merging two spaces/background


What is a good composition for a picture?
1. Overlapping creates space:
Overlap: Place objects slightly over one another. This will get the eye to move from one element to another. Objects should not be touching each other's edges (no kissing allowed). Avoid isolation. Build a relationship between the objects.

 2. Crop: Consider having objects go off the edge of the page. This gets the viewer in and out of the picture. Avoid floating objects within the edges of the paper.

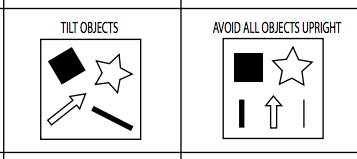
 3.Rotate: Consider placing objects at an angle. Things that are tilted create a more interesting composition. Artwork with objects that are perfectly lined up with the edge of the paper,tends to be boring.


4. Focal Point Create an area of importance. Give the viewer something to focus on. One way to achieve this is through size variation. Try not to have all elements the same size. Another way is through color dominance.


5.Off-Center: Avoid placing objects directly in the center of the page. Think about placing objects slightly to one side. This will create a more interesting composition. (this does not mean that asymmetrical design can not be successful)


Assignment 3- Continue to build the google slide
1. Take one picture of Gourds in Watercolor in a LIGHT value- wet on wet
2. Take one picture of Gourd s in Watercolor in a DARK value
3. One picture of finished art work


Coloring Steps:
using mixing color techniques for various tones.


1. Take TWO pictures of gradually adding
layers by using blending and color mixing
techniques
2. One picture of finished artwork ( oil pastel)
3. One picture of three- medium- artworks.
Glue Three finished artworks together in one
black piece paper


Coloring Steps:
Extra project :


1. Overlapping creates space:
Overlap: Place objects slightly over one another. This will get the eye to move from one element to another. Objects should not be touching each other's edges (no kissing allowed). Avoid isolation. Build a relationship between the objects.


4. Focal Point Create an area of importance. Give the viewer something to focus on. One way to achieve this is through size variation. Try not to have all elements the same size. Another way is through color dominance.


5.Off-Center: Avoid placing objects directly in the center of the page. Think about placing objects slightly to one side. This will create a more interesting composition. (this does not mean that asymmetrical design can not be successful)


Step 2 - Angles: The detailed step used to create a likeness of the object by noticing angles in the negative space (background). Focusing on the details by drawing the angles


Step 3 - Value: Add shading/cast shadow to show 3 D effects by creating highlights and shadows on the objects


Student Example

Techniques and Tips to Improve your Drawing Skills
Shading With 5 or more Different Value to improve your drawing.
Types of shading


Assignment 3- Continue to build the google slide
1. Take one picture of Gourds in Watercolor in a LIGHT value- wet on wet
2. Take one picture of Gourd s in Watercolor in a DARK value
3. One picture of finished art work

Values are a range of tones that span from pure white to pure black. In watercolor painting, the water-to paint ratio creates the value range. The more water added to the paint, the lighter the value.


Coloring Steps:
1. Identified and save the white spots unpainted.
2. Start with the lightest values on each gourd
gourd by using Wet on Dry technique.
gourd by using Wet on Dry technique.
3. Gradually build to the medium colors- using
mixing color techniques for various tones.(
Wet on Wet technique)
Wet on Wet technique)
4. Add more details by using Wet on Dry
technique.
5. Finish a placemat and wall using cool colors-
using mixing color techniques for various tones.
6. Add a cast shadow- from dark value to light
value.


Assignment 4- Continue to build Google slide
Gourd in Oil pastels-
Gourd in Oil pastels-
1. Take TWO pictures of gradually adding
layers by using blending and color mixing
techniques
2. One picture of finished artwork ( oil pastel)
3. One picture of three- medium- artworks.
Glue Three finished artworks together in one
black piece paper


Coloring Steps:
1. Start with the lightest values on each gourd.
2. Gradually build to the medium colors- using
blending and mixing color techniques for
highlight and shadows
3. Choose a color for the placemat and back
ground.
4. Add a cast shadow with cool color/ neutral
tone
Extra project :
Yayoi Kusama


